Introduction
Mantis Bug Tracker features configuration management for administrators to customize many of MantisBT features. In this tutorial, we will study each functionality covered under “Manage Configurations in Mantis”.
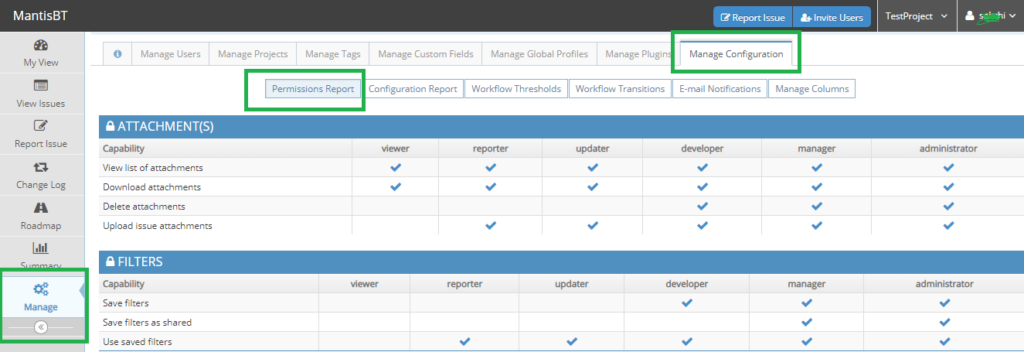
- To reach “Manage Configurations” Page, Go to “Manage”-> “Manage Configurations”.
- The tab which opens up is “Permissions Report”. This page shows the permissions awarded to various user roles by MantisBT. Default permissions are set which can be altered by admin:
- Attachments: Capability depicts the role and the checked boxes show the corresponding role is permitted to perform the action. For example: Delete attachments can only be carried by the developer, manager, and administrator.
- Filters: Using filters in “View Issues” Page, “Save filters” can only be used by developer and manager, administrator.
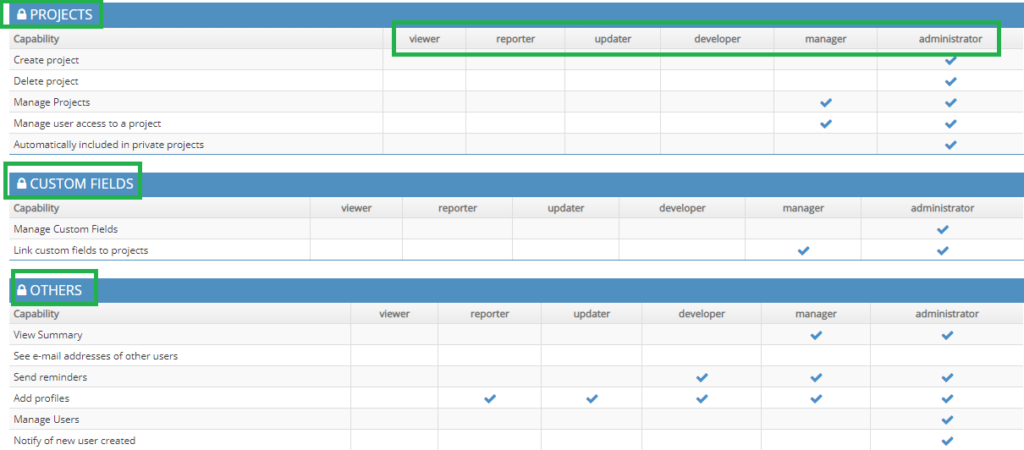
- Projects: Only admin has the privilege to create projects.
- Custom Fields: Manage custom field and link field to project feature is assigned to user role here
- Others: Other functions such as to send reminders, manage users, etc. are assigned here.
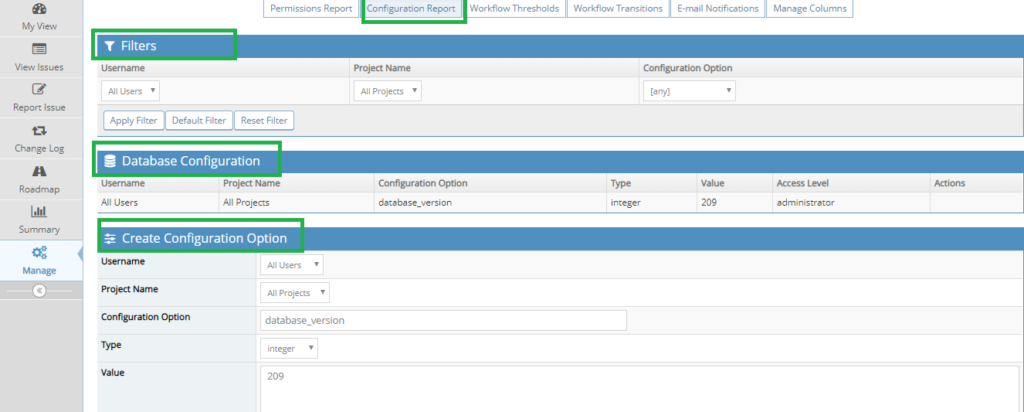
- Configuration Reports: This tab allows the administrator to set the configuration for all projects as well as a specific project. The supported databases are MySQL, PostgreSQL, MS SQL Server, and Oracle. The configuration is set in config_inc.php. The filter option allows to search for configuration which has been set using “Username”, “project name” and “configuration options”.
The filtered configurations will be shown in “Database Configuration” area.
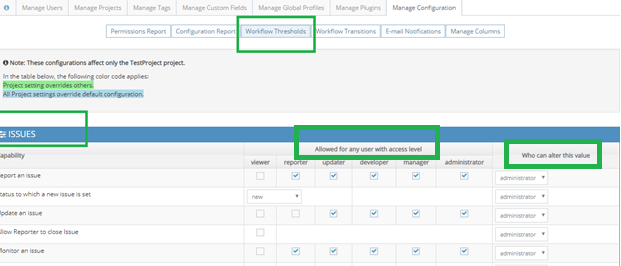
- Workflow Thresholds: This tab represents the configuration of properties of bugs, privileges of user role, who can alter the user role privileges. These changes are reflected at the project level as well as globally.
The administrator is:
- Able set the access levels for user role: For example ISSUES: To create an issue, user access level allowed to create an issue is reporter, developer, manager, administrator, and updater.
- Able to set who can alter the access levels for user role: The administrator is able to set which user role can alter the value set in above point. For example, a Manager can be set from the dropdown. He will be able to select the user roles which can create an issue for this particular project.
- Properties related to reporting the bug: The statuses to set initially when a new issue is created, the issue is reopened, the issue is resolved, and resolution to the reopened issue, when issue become read-only are selected here. The administrator also selects which user role can alter these values.
- Notes: Function related to notes such as add note, edit, delete can be assigned to a user role, and also privileges to change these values can be assigned to the user role.
- Others: Other function such as changelog, roadmap, and reminders can be set here.
After the above properties are set, the user clicks on “Update Configuration” button at end of the page.
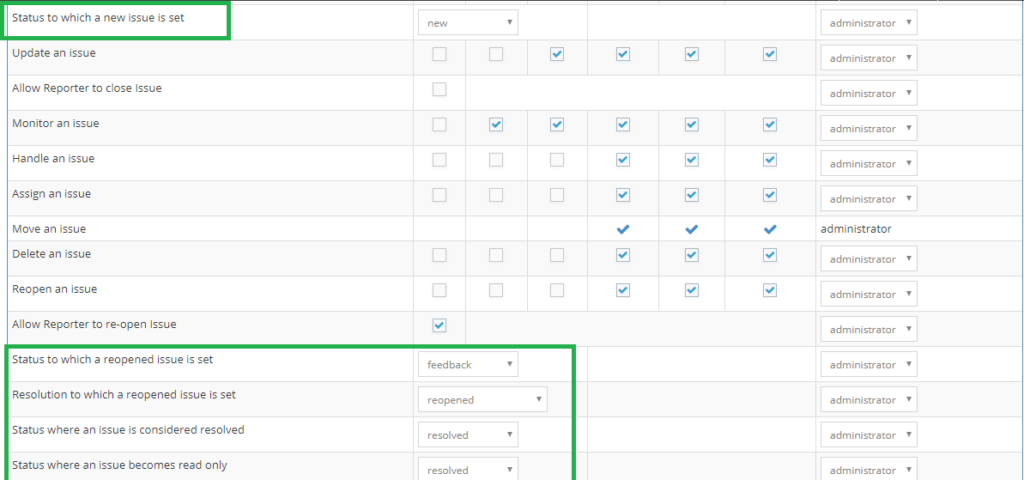
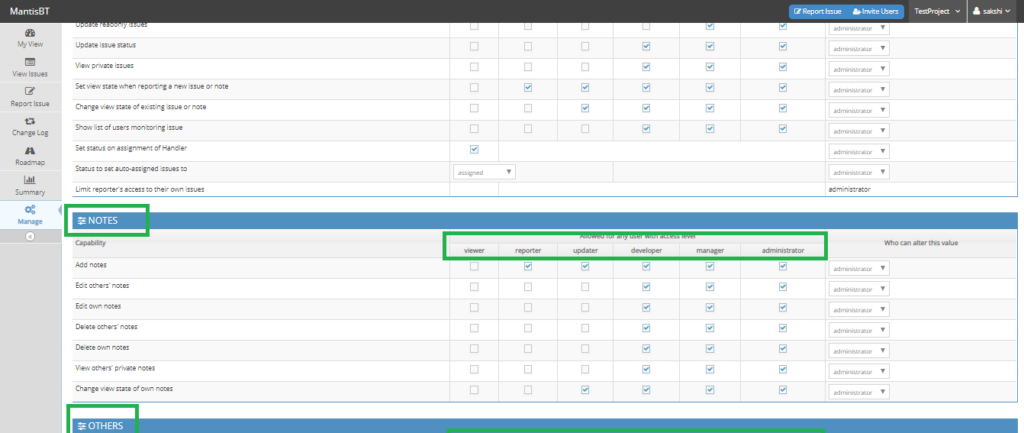
- Workflow Transitions: This tab will allow the administrator to set the workflow of bug life cycle. By workflow, it means the bug status order can be set here. These features are also set at project level and can vary for different projects. Main function performed in this tab are:
- Threshold that affect the workflow: It reflects the status which will be displayed when a new bug is created, bug is resolved or bug is reopened. The user role who has privilege to change this status can be set here. For example: “Status to which a new issue is set” is selected as “new” and the “Who can change this value” is set to “administrator”.
- Workflow: In this tab the bug cycle
workflow will be set:
- The next statuses which will be displayed after the current status to form a workflow are selected here.
- The default value depicts which value will be shown on the top of dropdown, by default.
- ”Who can change the workflow” will reflect the user role who can set the workflow.
- For example: if the current status is “new” , the next status could be “feedback”, ”acknowledged”, ”confirmed”, ”assigned”, ”resolved”, ”closed, the default status is set to “feedback”.
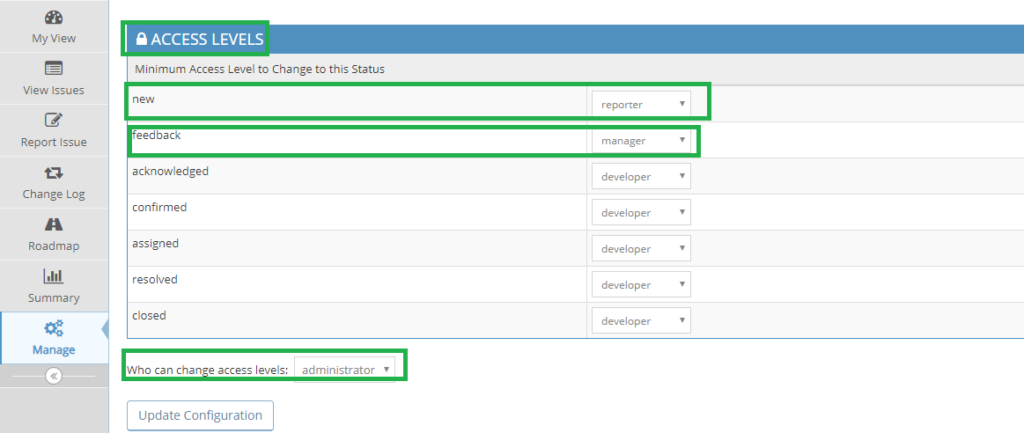
- Access levels: For the status, administrator can configure the user role who can change to this status. For example: status “new” can be changed by minimum access level of reporter. A “manager” can only see the status “feedback” to change the issue status to. This feature will also help in defining the workflow of bug cycle as the status can be changed only if the user role is allowed to do so. Admin can also set user role who can alter above value.
Click on “Update Configuration” button to save the above made changes.


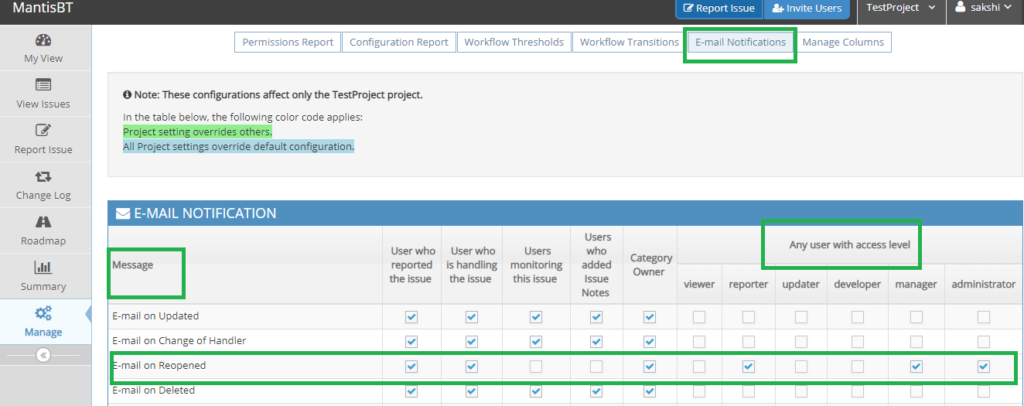
- Email Notifications: This tab is provided in Mantis Bug Tracker for the administrator to set the Emails sent out from the Mantis account to the users. The settings done here are also on project level. The administrator will check the boxes to whom
- The notification should be sent for any update, delete, reopen, change of handler, note, relationship changed etc. of bug.
- Email notification will also be sent if there is any change in status of bug such as “new”, ”feedback”, ”acknowledged”, ”confirmed”, ”resolved” and “closed”.
- Email notifications will be sent to “user who has reported the issue”, “who is handling the issue”, “monitoring the issue”, “and added issue notes”, “category owner”. The admin can tick which users should receive the email.
- Addition to this, certain user roles can be marked who will receive email notification namely “viewer”, “updater”, ”manager”, ”reporter”, ”developer”, ”administrator”.
- Administrator will also select the user role who can alter the above values from the various user roles.
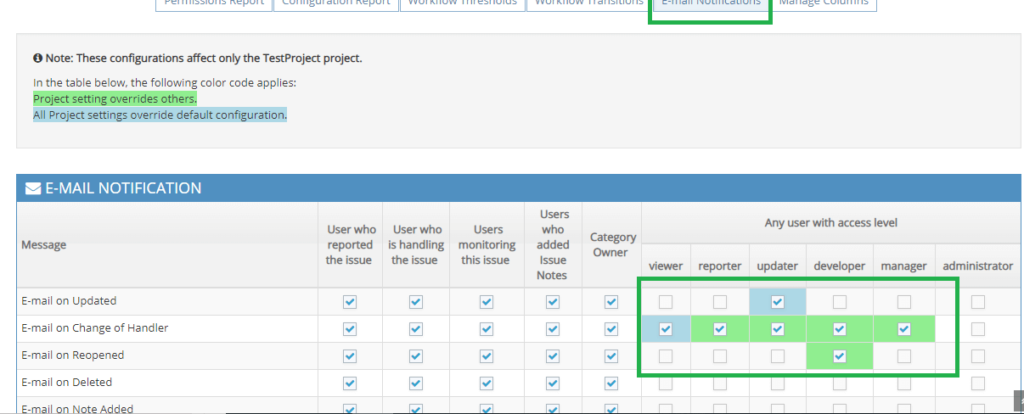
- For example: The Email notification on reopened bug is sent to user who reported the issue, user who is handling the issue, category owner (Category of the project).
The reporter, admin and manager of this project will receive email on reopened bugs for this project.
To save the changes made, “Update Configuration” button is clicked. Clicking on “Delete Project Specific Settings” will delete all the previous saved settings.
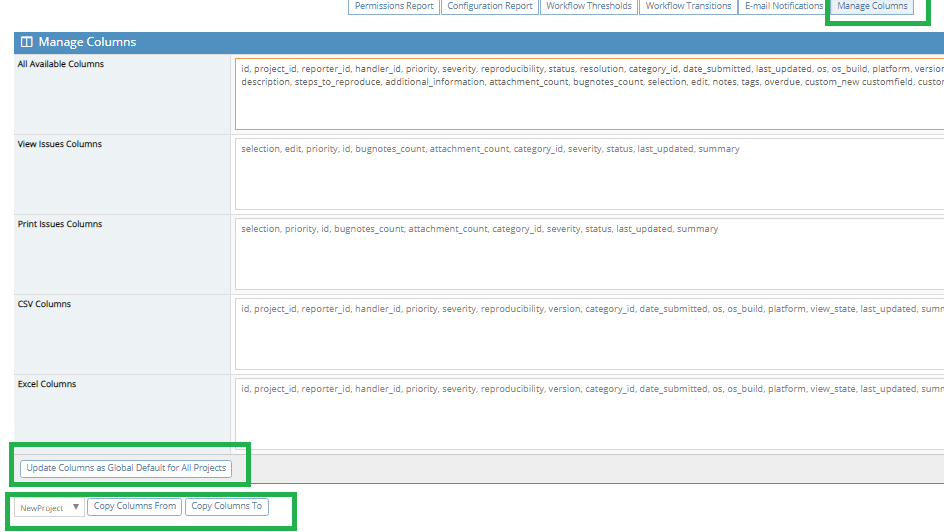
- Manage Columns: This tab will show the columns available in mantis in their variable name format. The administrator will be able to customize columns for:
- All available columns: Enter or delete the column name which he wants to show in hi mantis account.
- View Issue columns: The “View Issue” page will show which columns.
- Print Issue Columns: When an issue is printed, the entered columns will be printed.
- CSV columns: When issues are downloaded in csv format.
- Excel columns: When issues are downloaded in excel format.
- These settings can be done globally for all projects or only for this project.
- The user can also copy the above configuration from one project to other project.
- Important points to be noted:
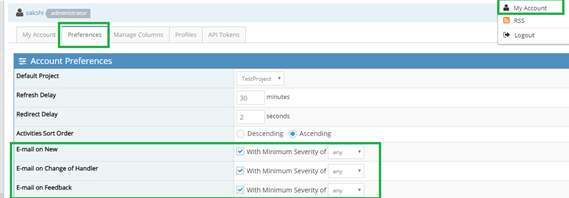
- A specific user (user role other than administrator) can also set his email preferences from “My account” page. For this go to “My Account”-> “Preferences”. These preferences will override the admin settings for a project. Admin can also set these set individually for a user from “Manage User” Tab.
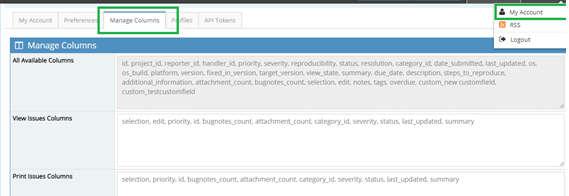
- Users can also manage columns from their account, by going to “My Account”->Manage Columns”. The custom field names are also added in “All available columns” and the names are case sensitive. So to enter any custom field, user should reference all available columns and copy the name from there.
- The configuration of “Workflow Thresholds”,
”Workflow Transitions”, “Email Notifications”, can be set at
- Project Specific Level and also
- “All Projects Level”.
Taking an example of “Email Notifications”,
- “All Projects” configurations are depicted in blue color and
- “Project specific” settings are shown in “green color”.
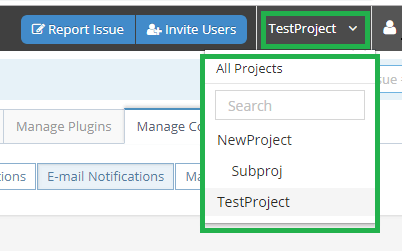
- To achieve this configuration, go to top menu bar ->select “All projects” from drop down, now settings will be done for all projects at global level => “Update Configuration”.
- Next again go to the top of window and select a project name “Test Project”, configure the notification->” Update Configuration”. These settings will be reflected at project level.
Conclusion
Manage Configurations in Mantis Bug Tracker provides a wide range of settings of workflows, email notifications, the access level of user roles, bug lifecycle statuses, etc. These settings are achievable at Global level for all Projects as well as Project Specific level. Additionally, users can manage email notifications and columns individually from their accounts. Thus, Mantis Bug Tracker is a powerful tool for customizations related to a single project and all projects.
⇓ Subscribe Us ⇓
If you are not regular reader of this website then highly recommends you to Sign up for our free email newsletter!! Sign up just providing your email address below:
Happy Testing!!!
- Tutorial #5: Project Management in Mantis Bug Tracker
- Tutorial #7: Mantis Bug tracker account management
- What is Decision Table in Software Testing With Example?
- Top 15 Bug Tracking Software To Simplify Your Defect Management Process
- Creating, Configuring And Using A Board In Jira
- Tutorial 6: Android application automation with TestComplete
- Handling IFrames in Selenium – Selenium Tutorial
- Tutorial 8: Executing A Test Case In TestLink
- Tutorial #2: Features of Mantis Bug Tracker And User Interface
- Why Can Codeless Testing Tools Overcome the Barriers of Test Automation in 2020?

