In the last tutorial, we have learned about the assertions and their use in functional testing using the SoapUI tool. Under the TestSuite and into the TestCase, we may further add the load test and check the performance of the test case under load condition. In Load Testing Using SoapUI tutorial, we are going to learn how we can create and add test cases for load testing and how to infer its result. But before that let’s understand what is the load testing.
Load testing is non-functional testing of a software application where the system is loaded with a number of requests in order to measure the system responses. Load testing is performed for an application with the anticipated volume in production to make sure that there is no deviation in the system response or its behavior while operating with this volume and such application can be marked as safe. The threshold load or volume after which the application starting breaking and shows deviation from its behavior is known as the application breakpoint and such testing is also known as reliability testing.
Load testing is also known as volume testing and software performance testing. Load testing is helpful in determining the maximum operating capacity of an application and to identify any bottleneck or slow operating component within the application. Stress testing is different from load testing in the terms that stress testing is conducted to determine the system behavior under the volume which is always higher than the normal operating volume or the peak load.
So far we have become quite familiar with the term load testing, now let’s discuss how this can be achieved in the SoapUI tool. Let’s us add the load test to the existing “FirstprojectTestCase1” as shown below with step by step screenshots.
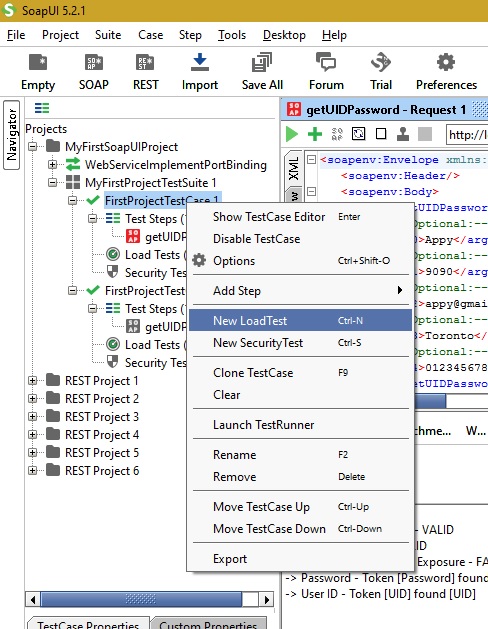
Step 1: Choose the project as “MyFirstSoapUIProject” from the navigator and right-click on the TestCase “FirstProjectTestCase1”. The small drop-down menu will get opened as shown below. Select “New LoadTest” option from the list. The keyboard shortcut to do it is Ctrl+N.
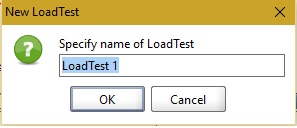
Step 2: Clicking on “New LoadTest” will open a new dialogue window asking to specify the name of LoadTest. Here you can give your customized name but here we are going to use the default name as “LoadTest 1”. Click the OK button to proceed.
Step 3: After the OK button is pressed, the actual load test window will be opened. The below screenshot demonstrates the actual Load Test console. It is by default preconfigured to run for 60 seconds shown with the label as “Limit:” which can be adjusted as per the need of load test. Also, it runs with default 5 threads using the simple load strategy. All of these values can be customized as per the testing requirements.

Step 4: Click on the green arrow present on the top left corner to run the load test. Afterload test is completed, it will look as present in the below screenshot.
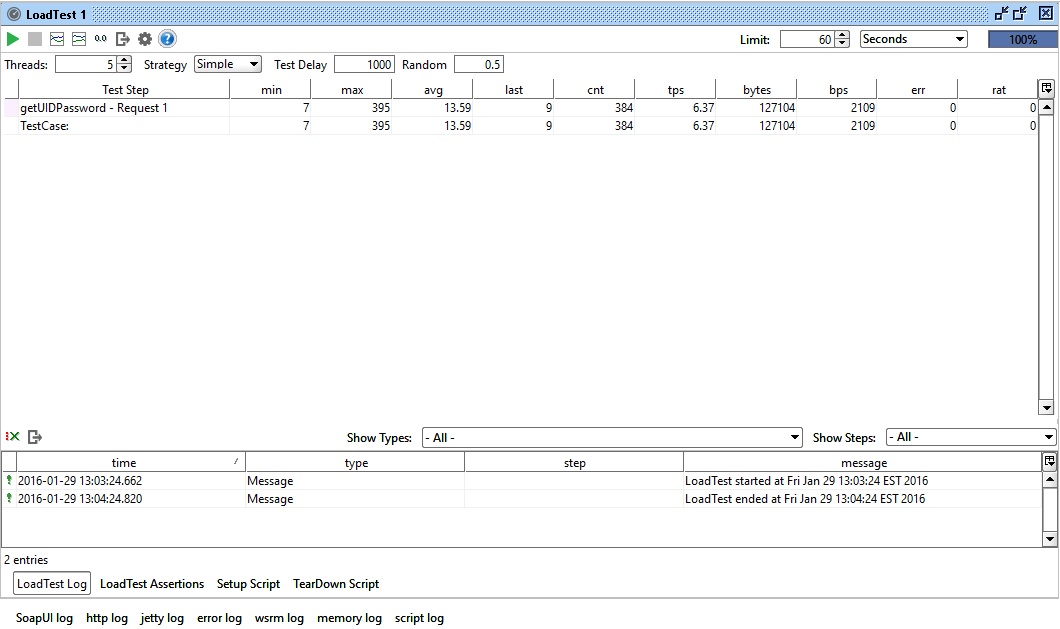
Step 5: Our first load test has been successfully completed using SoapUI. At the below section, click on the “LoadTest Log” to view the load test details when it started and ended. If there were any failures will also be visible in logs.
Next we are going to learn to add assertion to the LoadTest as follows.
Step 1: In the LoadTest editor, click on the bottom button “LoadTest Assertions” as shown in the below screenshot.
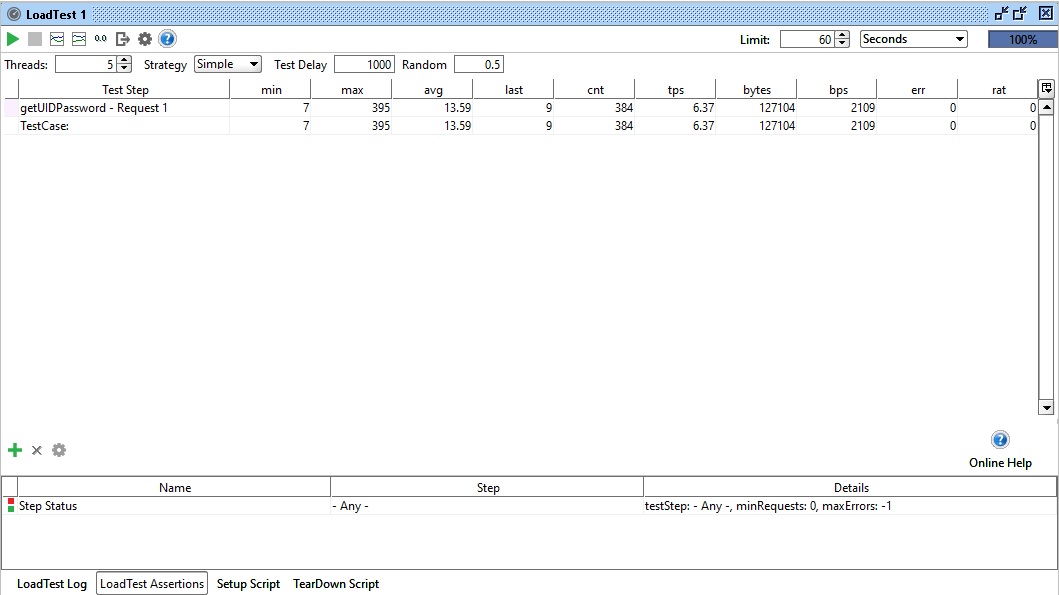
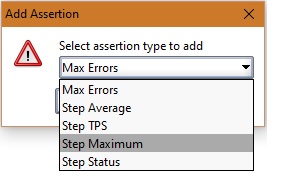
Step 2: To add the assertion, click on the assertion “+” green button. A dialogue window with drop down menu will get opened. Select “Step Maximum” from the drop-down and click the ok button on the dialogue window as shown below.
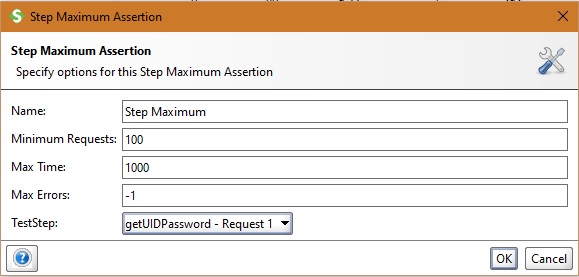
Step 3: This will open another dialogue window as “Step Maximum Assertion”. It will ask you to provide the name of this assertion and the maximum time in milliseconds that a response should take to serve a request from a web service. Here Max Time value is assumed to be 1000 milliseconds, therefore if a response from web service takes time more than 1000 milliseconds it will be logged as “err” into the Load test console and the assertion fails. If all responses under load test take “max time” less than 1000 milliseconds the assertion for this load test will pass successfully. After entering the details click OK button on the dialogue window to proceed.
Step 4: Now run the load test again with “Step Maximum” assertion. Below load test console shows that none of the response has exceeded max time above 1000 milliseconds as “err” is zero.
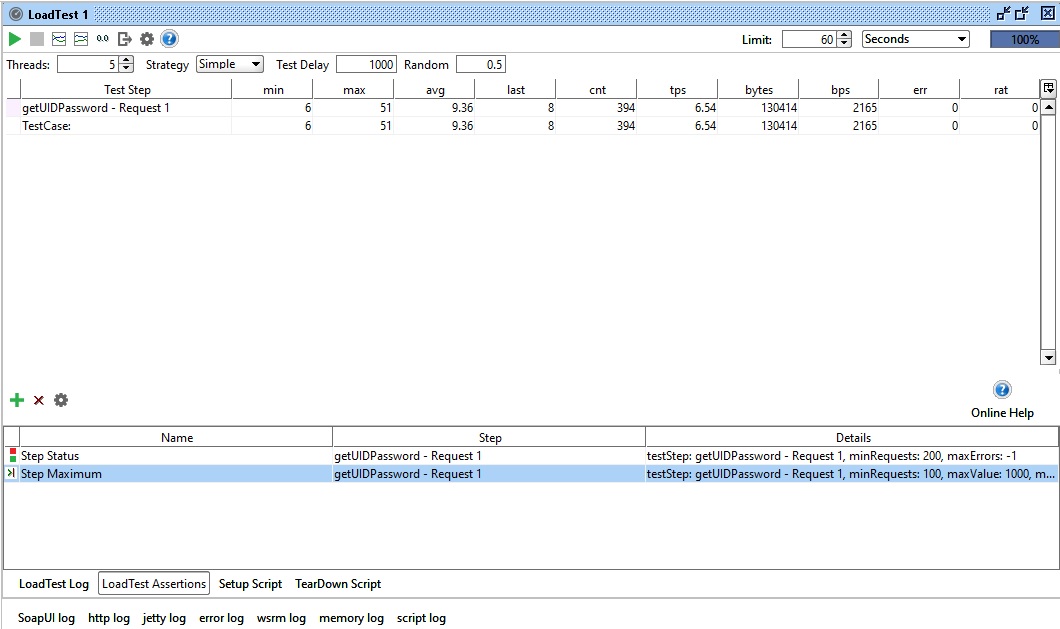
This is how, we can add assertions to the step of the web services request operation under test and note down the response time if any of those exceeding the pre-decided max response time. This was one of the assertion. We may add and try other assertions such as Max error, Step Average, Step TPS, Step Status, etc.
-
- Max Error: This assertion checks on the maximum absolute errors and maximum relative errors permitted while running the load test on a particular web service.
-
- Step Average: We can decide and put the maximum step average response time in milliseconds after choosing the sample interval in milliseconds from the web service operation and add this as an assertion to the current load test. Also, we can further put a check on the maximum errors permitted for this assertion test.
-
- Step Status: This assertion checks on the minimum requests and the maximum errors permitted for a web service under load test.
-
- Step TPS: This assertion allows to put a check on the minimum TPS permitted on the response of the web service which under the load test. Also, we can further put a check on the maximum errors permitted for this assertion test.
- Step Maximum: This assertion is already demonstrated in the above example which checks that each response from the web service under load test does not exceed this maximum response time. If it does it will log as an error and further, we may put the check-in the same assertion for maximum such errors permitted.
Conclusion:
Today we learned the “How to create Load Testing Using SoapUI?“. In this article we covered the following points:
- How to add a load test to the existing SoapUI project.
- Learned to add an assertion to the Load Test.
- Add assertions to the step of the web services request
Next tutorial >> Mock Services Testing in SoapUI
Please share your thoughts and experience in the comments below on Load Testing Using SoapUI.
⇓ Subscribe Us ⇓
If you are not regular reader of this website then highly recommends you to Sign up for our free email newsletter!! Sign up just providing your email address below:
Happy Testing!!!
- Create Your First SoapUI Project – Step By Step Guide
- SoapUI Tutorial For Beginners [Full Series] – Introduction to SoapUI – Why SoapUI?
- Installation and Configuration of Soap UI – Complete Guide
- Mock Services Testing Using SoapUI
- How To Do Security Testing Using SoapUI?
- What Is Web Service? How It Is Tested?
- Web Service Sample Project & Testing
- How To Do Functional Testing In SoapUI?
- REST Testing using SoapUI
- 10 Tips for the SoapUI Beginner

