In this chapter, we are going to discuss Selenium Core Extensions and user-defined extensions. Before, we can begin let’s take a quick recap of the extensions present in Selenium IDE as we discussed in chapter 2 of this tutorial.
1) Action: It commands Selenium IDE to perform an action i.e. accessing UI (User Interface) on the web page. E.g. doubleClick, ClickAndWait, dragAndDrop, dragAndDropAndWait, etc.
2) Assessors/Assertion: It defines the verifications to be done on the data received from UI after running the following commands such as verifyElementPresent, verifyElementWidth, verifyExpression, verifyHTMLSource, verifyLocation, verifyMouseSpeed, etc.
3) Locator Strategy: It defines a strategy to locate a web element on the Web Page. It could be by name, ID, CSS, tag, XPath, etc.
There are lots of stuff that could be done using Selenium IDE, but still, it is required to add some more functionalities on testing need basis for our project. In such scenarios, we can add our custom extensions on the top of the library which are also known as ‘User Extensions’.
E.g. If we need to perform an action while testing on a web element to convert the text to lower case before filling up the details into it. There is no such action exists in Action library for Selenium IDE. Therefore, we can create our user extension to convert text to lower case.
User Extension Creation :
Before we can start working on user extension for Selenium IDE, we should be well versed with JavaScript and it’s prototype object concepts as shown below:
Selenium.prototype.doTextLowerCase = function(locator, text)To create a customized ‘User Extension’ in IDE, we first need to create a JavaScript method and later we need to add this method to the Selenium object prototype and PageBot object prototype. Once added we can restart Selenium IDE and we can see all these extensions that were added in JavaScript prototype are recognized by Selenium IDE with their name (here doTextLowerCase, etc..). User-defined extension code for ‘doTextLowerCase’ is shown below.
Following are the ways, we could define User Extensions in Selenium IDE.
1) Action:
All actions, we start by “do”, i.e. if action is to create an extension for Lower case text then its name will do TextLowerCase. After adding this function to Selenium IDE, it will automatically create a wait function for this action. Therefore, in this case we will have two methods known as ‘doTextLowerCase’ and ‘doTextLowerCaseAndWait’.
Selenium.prototype.doTextLowerCase = function(locator, text) {//Here findElement is handling all type of locators i.e. by CSS, XPAth, NAME, ID, etc.var element =this.page().findElement(locator);// Create the text to Lower Casetext = text.toLowerCase();// Replace the web element text to the Lower case text.this.page().replaceText(element, text);};Explanation of JavaScript code:
- Here, we are calling Selenium prototype object to create a new action ‘doTextLowerCase’ which is a method that accepts two parameters namely, locator and text.
- The locator object may contain the web element’s name, ID, XPath, CSS, tag, etc. to locate the web element using JavaScript page object’s findElement method as shown above.
- Text as an argument, we are converting to lower case using JavaScript method.
- At last, we are using ‘replaceText’ method of the page object to replace the page text of the selected web elements into lower case.
2) Assessors/Assertion:
We can create our own customized function for accessors in Selenium IDE. All accessors in Selenium IDE are registered with selenium object prototype that will always be prefixed by “get” or “is” e.g. getValueFromCompoundTable, isValueFromCompoundTable, etc. It can accept two parameters. The first parameter is the target and the second parameter is the value field in the test case. Let’s under this with the help of following JavaScript code.
Selenium.prototype.assertTextLowerCase = function(locator, text) {//findElement method to locate element.var element =this.page().findElement(locator);// To verify text convert to Lower casetext = text.toLowerCase();// To get actual element valuevar actualValue = element.value;// Make sure the actual value matches the expectedAssert.matches(expectedValue, actualValue);};Selenium.prototype.isTextASEqual = function(locator, text) {returnthis.getText(locator).value===text;};Selenium.prototype.getTexAstValue = function(locator, text) {returnthis.getText(locator).value;};Explanation of JavaScript code:
- Here, we are calling Selenium prototype object to create as new accessor ‘assertTextLowerCase’ which is a method that accepts two parameters namely, locator and text.
- The locator object may contain the web element’s name, ID, XPath, CSS, tag, etc. to locate the web element using JavaScript page object’s findElement method as shown above.
- Text as an argument, we are converting to lower case using JavaScript method.
- Next, we are storing the actual value of the web element into ‘actualValue’ field.
- Using the Selenium prototype object ‘isTextAsEqual’, we are comparing the actual value of the web element selector by a locator with the lower text value. If both values are equal, the method will return true else false.
- Using the Selenium prototype object ‘getTextAsValue’, we are returning the text value of the web element located by the findElement method of the page object.
3) Locator Strategy:
We can create our own customized function to locate an element by extending PageBot prototype with a function that is prefixed as “locateElementBy“. This function will accept two parameters. The first parameter is the locator string ‘text’ and the second parameter is the document ‘inDocument’ where it will search for this locator string as shown below. Following is the example for Lower Case Text Locator.
// The "inDocument" is a document you are searching.PageBot.prototype.locateElementByLowerCase = function(text, inDocument) {// Create the text to search forvar expectedValue = text.toLowerCase();// Loop through all elements, looking for ones that have// a value === our expected valuevar allElements = inDocument.getElementsByTagName("*");// This star '*' is a kind of regular expression it will go through every element (in HTML DOM every element surely have a tag name like<body>,<a>,<h1>,<table>,<tr>,<td> etc. ). Here our motive is to find an element which matched with the Upper Case text we have passed so we will search it with all elements and when we get match we will have the correct web element.for(var i =0; i < allElements.length; i++) {var testElement = allElements[i];if(testElement.innerHTML && testElement.innerHTML === expectedValue) {returntestElement;}}returnnull;};We have saved above JavaScript code in a file ‘CustomUserExtension.js’ at location ‘C:\selenium_demo\’ on the local machine. We will add this file to Selenium IDE as User Extension by following steps.
Steps to Add Extension to Selenium IDE:
Step 1: Open the Firefox browser where Selenium IDE add-on is already installed. Open Selenium IDE as a pop-up window.
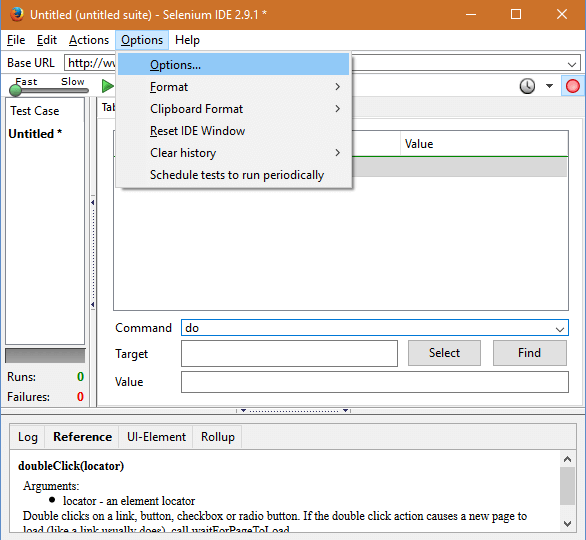
Step 2: Navigate to the top Menu of the Selenium IDE as Options a Options… as shown below.
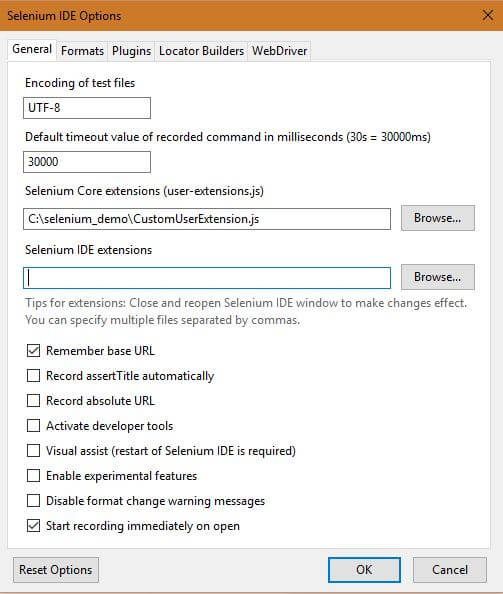
Step 3: This will open up a dialogue box asking to provide the local path of the Selenium Core Extensions (user-extensions.js) file. Provide the path as location ‘C:\selenium_demo\CustomUserExtension.js’ and click on the OK button as shown below.
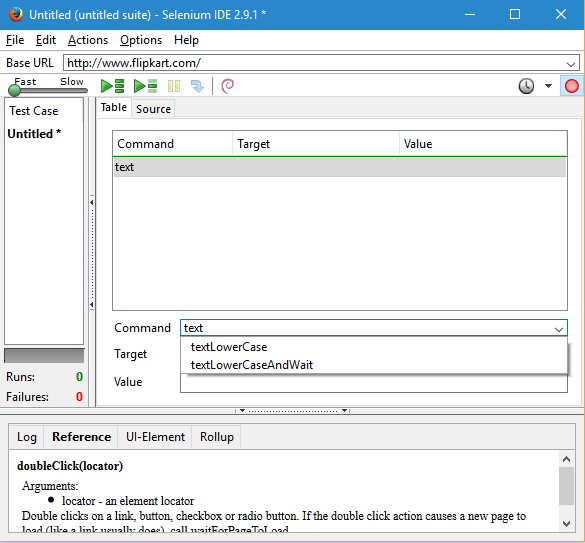
Step 4: Selenium User extension has been added successfully. We can such as extension in Selenium ID after a search for the method in ‘Command’ field of selenium IDE as shown below. We can observe that both new methods ‘’ and ‘’ that we created as user extension are present in Selenium IDE.
Over to you:
In Selenium Core Extensions tutorial, we have learned about the creation of Selenium User-defined extensions that are not directly supported by the Selenium IDE library. We have created an extension for action, accessors or assertions and locator strategy by using the Selenium object prototype and PageBot object prototype in JavaScript. Using the same approach, we may create more user-defined extensions as per the testing need of the application under test by Selenium IDE.
If you are not a regular reader of this website then highly recommends you Sign up for our free email newsletter!! Sign up just providing your email address below:
Happy Testing!!!
- Selenium Training Series – Getting Started with Selenium IDE
- Difference between selenium IDE, RC & WebDriver
- How to create Selenium WebDriver Test using Selenium IDE? – Selenium Tutorial
- What is Selenium Webdriver? – Selenium Training Series
- Start Selenium WebDriver Test Script on your own – Selenium Tutorial
- Learn JUnit annotations used for your Selenium WebDriver automation
- Complete Guide on XPath in Selenium
- How To Access Links & Tables Using Selenium Webdriver?
- Sessions, Parallel run, and Dependency in Selenium
- How to Perform Selenium Automation Using LambdaTest?


