In our previous article we have learned basic Introduction to JUnit Annotations used in your Selenium WebDriver Automation Test script. Now I want to give you brief idea about how to use these JUnit Annotations & what is actual use in the Selenium WebDriver code.
In Selenium WebDriver if you want to run test script using JUnit framework we have to add few JUnit Annotations in Selenium WebDriver Test script.
Below we are using few most commonly used JUnit annotations & execute our Selenium WebDriver Tests:
- @Before
- @Test
- @After
Let’s open previously created project in Eclipse IDE (click here to get How to create Selenium WebDriver Test using Selenium IDE? – Selenium Tutorial)
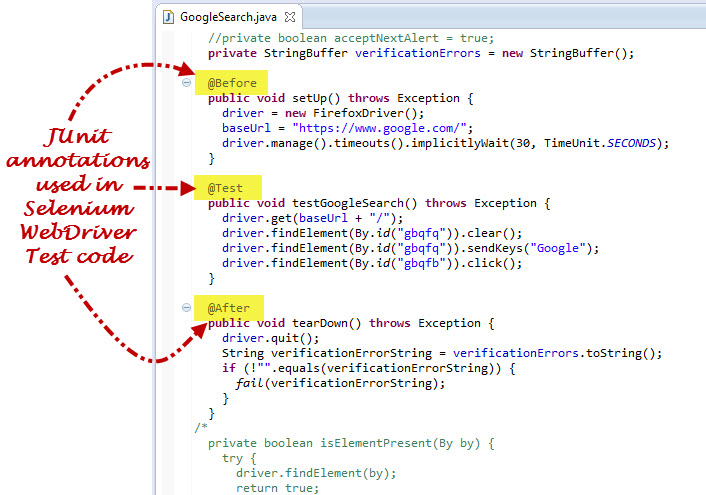
1) Once you open the above created Selenium WebDriver Test script and then check if have we used JUnit annotations in the code or not?
2) The highlighted part in above script is saying that we have used JUnit annotation in Selenium WebDriver code. In this script we have used @Before, @Test and @After annotations.
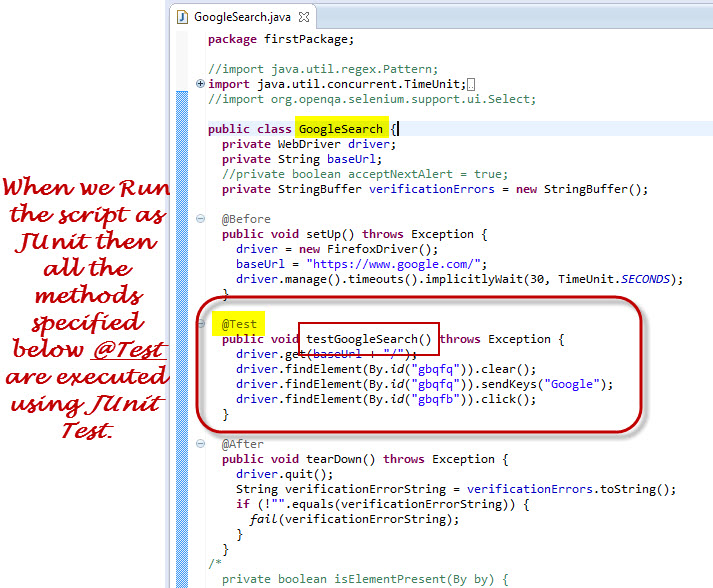
@Test
When we Run the script as JUnit then all the methods specified below @Test are executed using JUnit Test. As @Test JUnit annotation is specified before the testUntitled() method, this method will be executed when we run the “GoogleSearch” class using JUnit (i.e. Run As > JUnit Test)
@Before
All the methods are defined in the @Before are executed first & then method which are defined in @Test are executed. The primary use of this annotation is used to set up the test environment which is needed for executing the test. You can in below screen shot we have used setup() method in @Before.
@After
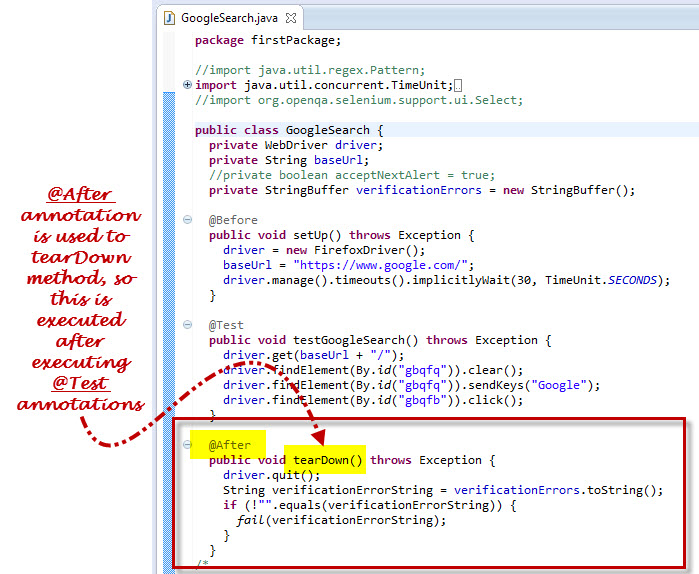
All the methods are defined in the @Test annotation are executed first & then method which are defined in @After are executed. The primary use of this method is to do tear down i.e. deleting temporary data or setting up default values or cleaning up test environment etc.
Here @After annotation is specified before the ‘teardown()’ method. Hence this method will be executed by JUnit after executing all methods that are specified with @Test Annotation.
Run Selenium WebDriver Test Code without JUnit Annotations:
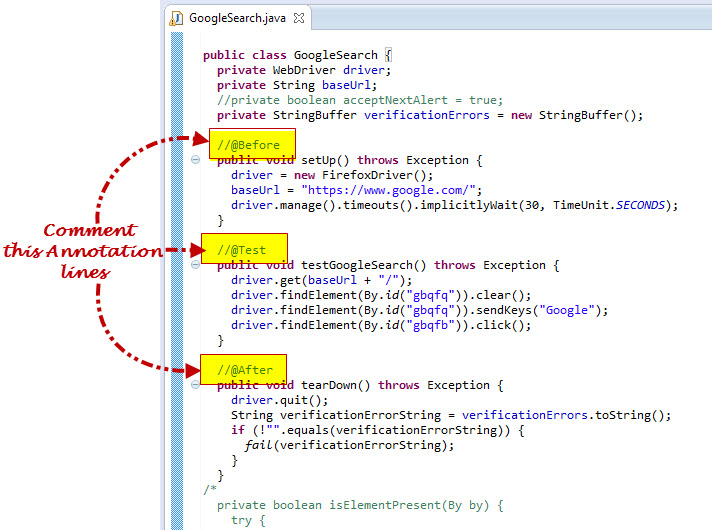
Now let’s try to run Selenium WebDriver Test Code with commenting JUnit Annotaions & check if you are able execute test code as JUnit Test or not.
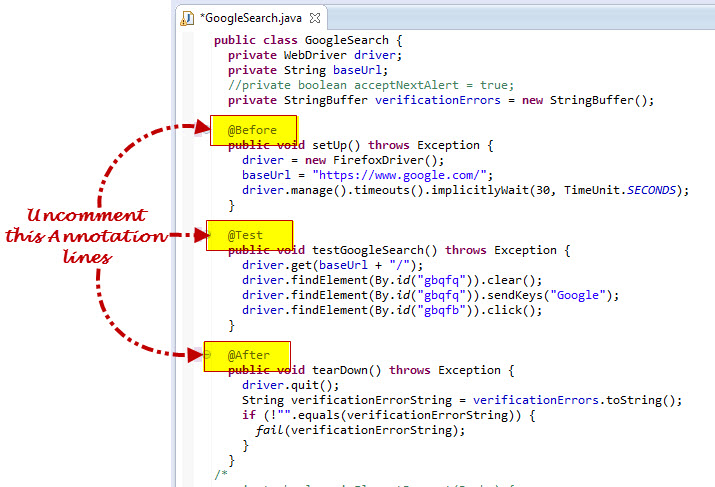
1. Comment all three Annotations line as shown in below screen shot. To comment line we have to add // before each line which we have to comment.
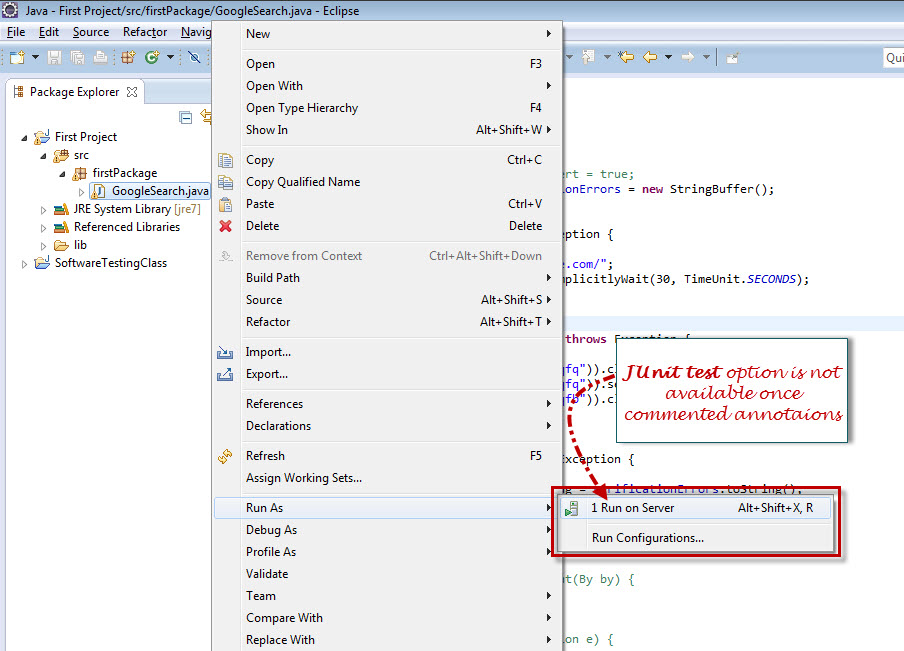
2. Run the Selenium WebDriver Test code with JUnit Test after commenting the annotations as shown below:
Now you understand if we are not using JUnit annotations in the Selenium WebDriver code then while running the code you cannot able to run the code as JUnit Test.
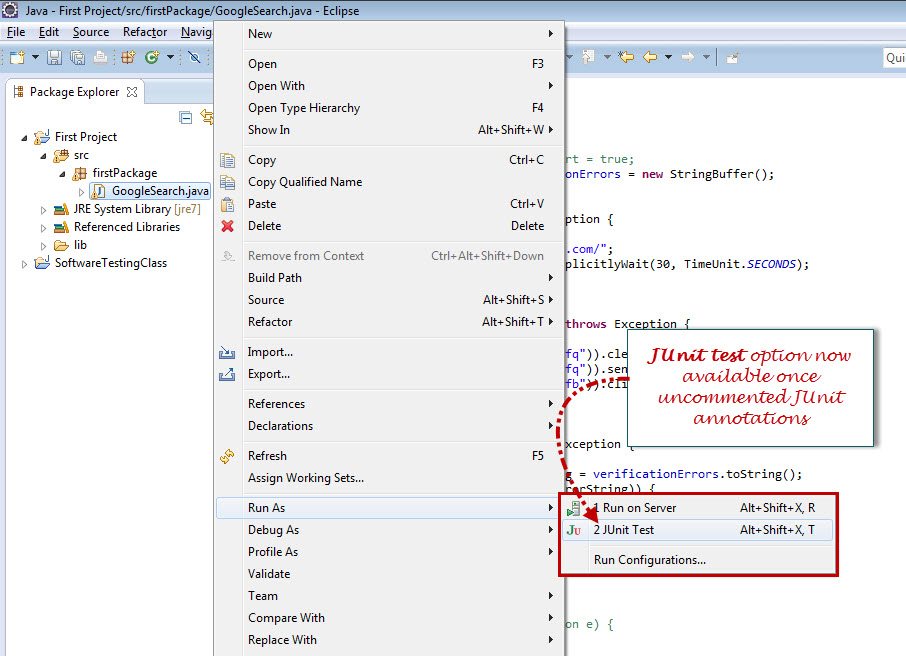
3. Now let’s uncomment annotations same as shown in below screen shot & check if you able to run the test using JUnit or not:
4. Have you notice that if we try to Run Selenium WebDriver code then the JUnit Test option is available as shown below:
So till now we have learned we can run the code using JUnit only if the JUnit annotations added in the code else Run As > JUnit Test option will not be available to Run the test.
Over to you
Have you ever tried executed your Selenium WebDriver script with & without JUnit Annotations? If no, then what are you waiting for, just follow above simple steps. If you have experience on Selenium WebDriver then can you please share experience in comments below.
If you enjoy reading this article please make sure to share it with your friends. Leave your questions/tips/suggestions in the comment section below and I’ll try to answer as many as I can.
- Learn JUnit annotations used for your Selenium WebDriver automation
- Step by Step Guide on Database Testing using Selenium
- What is Selenium Webdriver? – Selenium Training Series
- How to run your first Selenium WebDriver script – Selenium WebDriver Tutorial
- How to create Selenium WebDriver Test using Selenium IDE? – Selenium Tutorial
- Getting Started With Installation Of Selenium WebDriver – Learn Selenium
- JUnit and Hybrid (Keyword+Data Driven) Framework – Part 1
- How to Perform Selenium Automation Using LambdaTest?
- Top 15 Common Selenium Exceptions You’ve Probably Seen
- Complete Guide on Implicit and Explicit Wait in Selenium

6 thoughts on “How to use JUnit Annotations in Selenium WebDriver Automation Script”
Hi SoftwareTestingClass Team,
I Thank You for this wonderful site and also for the above article too.We have a request to make.Please publish more articles on Selenium(IDE,WebDriver[MAINLY & MOSTLY]),JUnit,TestNG,ANT and SOAP UI(for WebServices Testing).
Your Explanation is very Good and Understanding for people like us.Thanks Again.
~Chaitanya
Excellent work done by you by posting such articles.
I have already subscribed for your news letter.
Could you please suggest some sample websites or applications to try some hands on selenium webdriver , Junit , TestNG.
Please let me your test automation approach when you get web application for automation testing using selenium
Thank you,
Bhushan
@Madiraju Krishna Chaitanya, @Bhushan – In upcoming articles I am covering articles on JUnit, TestNG, ANT in Selenium training series.
Yes, I am also planning write on how to perform web service testing using SOAP UI.
could you kindly explain me what is the exact usage of annonations? and what’s the use of running our code as JUNIT TEST
when opening Tutorial 8 – Start Selenium WebDriver Test Script on your own,the display:Not Found Sorry, but you are looking for something that isn’t here.
Pls add this tutorial ,thanks!
Great posts, great tutorials. They have a very accessible language and explains complex concepts in a very simple manner. Keep the good job!