This is the 7th UFT Tutorial in our UFT training series. Please visit this post to check out list of all tutorials we covered till now. In today’s article we are covering Examples of Actions in UFT, What is action in UFT, Why we use actions in UFT, How to use actions in UFT & exact meaning of action in UFT?
What is a Action in UFT?
The Actions are used to divide your tests into logical parts. Consider a example of ticket booking system where user performs different actions like login into application, Book the ticket, Make Online Payment and Logout. In the layman terms this is a specific activity perform by user on application under test.
There are three different Action calls present in UFT:
1. Call to copy of action.
2. Call to new action.
3. Call to Existing action.
First we are creating a new action and learn Examples of Actions in UFT using the Mercury Tours Website.
1) Launching the HP Unified Functional Testing:
Start UFT by double-click the UFT icon on your desktop or click on
“Start > All Programs > HP Software > HP Unified Functional Testing“.
Confirm that only “Web” Add-in is selected in the Add-in Manager then click on “OK” to close the Add-in manager and to open UFT window. It might take few seconds depending upon machine speed. If UFT is already opened, check which add-in is loaded. If the is not already displayed Web Add-in is not loaded, you must exit and restart UFT. When the Add-in Manager opens, select the Web Add-in, and clear all other add-ins.
2) Explore the Start Page:
– If it does not display in the Document Pane, click the Start Page tab.
– Select “Options” drop-down arrow from top-right corner of the Start Page.
– Select “Close Start Page after test loads” > The Start Page will close automatically after you create a test.
3) Creating New UFT Test:
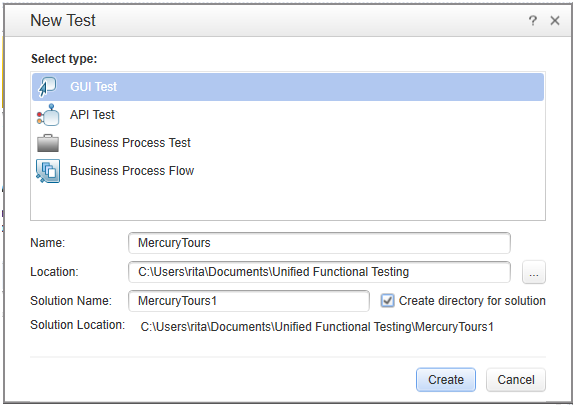
– Create a new test by clicking the “New” button > The “New Test” dialog window opens
– Select “GUI Test” and change the Name: Mercury Tours. (If you want, you can change Location and Solution Name too. When you change the Solution Name, just check the “Create directory for solution” then click on “Create”. The Solution Location value will be automatically updated with the new directory.)
After clicking on “Create”, a blank test opens with new test flow. The Solution Explorer shows the solution name created for this test.
Steps to rename the logical name of Action1
1) In the canvas, right-click the “Action1” image to select Action Properties.
2) Once the Action Properties dialog box opens, enter Name: “Login” as the new name with description.
3) Click “Yes”.
4) In the canvas, Action1 will get change to “Login”.
A] Inserting call to New Action
New action can be inserted at any point of time during testing by following given below steps,
Create a new action by giving name Flight Finder. Right-click anywhere in the canvas to choose “Call to New Action”.
The “Insert Call to New Action” dialog box opens, enter the Name: Flight Finder, and ensures that “Reusable Action” and “At the end of the test”both options are selected then click “OK”.
Once the dialog box gets closed, the Flight Finder action will add to the end of a test.User can see the modifications graphically in the test Name Tab as shown below:
Similarly, user can create other actions as like Flight Finder action creation process. Create action for “Select Flight” and “Book Flight”.
B] Inserting Call to Copy of Action:
Copy of an existing action can be inserted at any point of time during testing by following given below steps,
Create a copy of an existing action “Flight Finder”, right-click anywhere in the canvas to choose “Call to Copy of Action”.
The dialog box opens to create copy of action, Select the “Test Name”, “Action Name” and also select the location the action to be inserted.
Once the dialog box gets closed, the copy of Flight Finder action will add to the end of a test. User can see the modification graphically in the test Name Tab as shown below:
C] Insert Call to Existing Action:
Existing action can be inserted at any point of time during testing by following given below steps,
In the canvas, right-click anywhere and choose “Call to existing Action”.
In the “Select Action” Window, give the test name, Action name, description and also specify the location of the action to be inserted.
User can see the modifications graphically in the test Name Tab as shown below,
Save the created test by clicking on “Save”.
⇓ Subscribe Us ⇓
If you are not regular reader of this website then highly recommends you to Sign up for our free email newsletter!! Sign up just providing your email address below:
Happy Testing!!!


