In last two articles we have learned about “Brief explanation of how Keyword view works – Exercise 1 and Exercise 2“. In this Exercise, you will get to know how to work with condition and loop statement, in Keyword view UFT.
Conditional and Loop Statements in Keyword View:
Conditional statements: In this statement user can join decision making into their tests.
Loop statements: In this statement user can run a group of steps frequently, either while or until a condition is true. Also, user can use loop statements to replication a group of steps a specific number of times.
These are some conditional statements available in the Keyword View:
If… Then, Else If… Then, and Else: Executes a statement or a series of statements created on definite Conditions. If a condition is not fulfilled, the next Else if condition or Else statement are examined.
These are some loop statements available in the Keyword View:
While… Wend: Executes a series of statements as long as a definite condition is True.
For… Next: Uses a counter to perform a group of statements a specified number of
times.
Do… While: Makes a series of statements forever, as long as a specified
condition is True.
Do…Until: Executes a series of statements forever, until a specified condition
becomes True.
1) Using Keyword view, how to insert Conditional “If… Then… Else” Statements
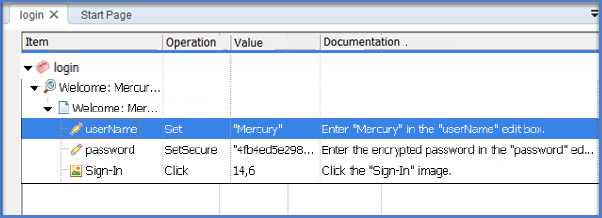
To insert the conditional statement, first choose the step on which you want to insert the conditional statement, in the Keyword View. Let us take an example of “username” shown in the figure below.
Then go to Edit > Code Snippet to choose “If… Then” will add a new statement below the “userName” step, shown in the figure below.
Next, insert the “If” conditional statement to the object, click on the Itemcell, the drop-down box opens, choose on which object you want to insert the condition statement. For example; choose the “userName” object.
Next, after choosing the object, click on the Operation cell to choose the operation on which you want to act. For example; choose the “Exist” Operation shown in the figure below.
Enter the value in the Value cell, if required. But, “Exist”property does not require a value in the Value cell.
Next, insert a “Then”statement in the next row of the “If” statement by right-clicking on the “If”statement step and select “Insert New Step”. A new row will be inserted below the “If” statement row, shown in the figure below.
Ensures that, you have already set the values of the Operation and Value columns of the new step.
Next, delete the row above the “If”statement, shown in the figure below.
You can finish the statement with an “Else”statement or can nest an additional level in the statement. To do this, first choose the “If”statement with one of the following options, given below.
The given below figure shows the statement that check the User Name edit box exists in the Mercury
Tours web site. If the edit box exists, then only a user name gets entered,else a message is sent to the Run Results.
The same example displays in the Editor as follows:
It is optional that, after creating a conditional statement, use the “Insert Step After Block option” to insert a step outside of the conditional statement block.
2) Using Keyword view, how to insert Loop Statements
To insert a loop statement in the Keyword View,
Choose the step that need to follow the loop statement, go to Edit > Code Snippet and select the statement type from the sub-menus. This will add the new statement in the Keyword View below the selected step, and then in the Value column give the vital condition (For i = 0 to ItemsCount– 1)
The loop statement can be completed by choosing the loop statement step and record a new step to add it to the loop statement.
Next, right click on the loop statement step and choose “Insert New Step”or press INSERT to insert a new step into the loop statement.
Additionally,after completion of a loop statement process, you can also use the “Insert Step After Block”option, or press SHIFT+INSERT to insert a step outside of the loop statement block.
The given below figure shows the example that count Items of the list one-by-one.After selecting Item one-by-one, the test continues.
The same example displays in the Editor as follows:
3) Using Keyword view, how to add a standard step after a Conditional or Loop Blocks
This task has been done by, First, selecting the end of the conditional or loop statement: Click below the conditional or loop statement step to add anew step.
Second, add a new step through the “New Step After Block” option: To do this, right-click on the conditional or loop statement and choose “Insert New Step After Block”, or press SHIFT+INSERT. This will add a new step in the Keyword View at the end of the conditional or loop block, outside of the conditional or loop statement (as a sibling).
Third, describe the step by modifying it by giving the content.
⇓ Subscribe Us ⇓
If you are not regular reader of this website then highly recommends you to Sign up for our free email newsletter!! Sign up just providing your email address below:
Happy Testing!!!
